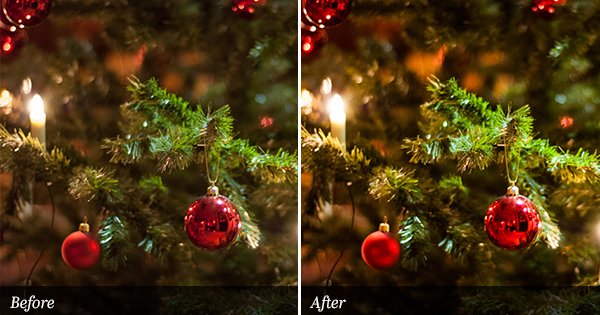
When you’re out taking photos of horizons (oceans, beaches and landscapes etc) you really have to think twice before you take the shot. With an incorrect measurement in the camera it’s hard to get the right exposure on both sides of the horizon. Sometimes you don’t even have the time to adjust your camera to get the perfect exposure. Lightroom is just the tool for you when it comes to horizons and exposure problems.I’ve made a preset for you all to play around with to get more familiar with how “Graduated filters” work in Lightroom. I call it “PH Graduated Horisont”.
In my example photo, the lower part of the photo is very dark. Almost to dark to see the details at all. I could lighten it up using brightness and contrast in Lightroom, but that would affect the whole image and result in a very bright sky instead.
To fix this issue I use graduated filters which can be found under the “Develop” tab in Lightroom.
See the preset in action:
SOOC/ORIGINAL:

PH Graduated Horisont:

Graduated filters can be used with the same effects as the “Adjustmen Brush“. With this in mind I have added a blue color tone on the filter for the sky to make it more dramatic.
Play around
Your horizon might be on a different position in the photo. Luckily you can replace the graduated filters to fit your own horizon.

If you would like to change the brightness or contrast (or any other effect) you can easily do that too.

Finally you might want to change the color of the sky…


Another great one. Thanks, Pierre.
Thank you Sunny!
txs so much!
:-)
I am loving the presets but want more and more, have not had time to ready but you have so much info, really appreciate it!
thanks
Thank you Feuza!
I’m so glad you like my work.
Take care and have a nice day!
I love this preset, but I was wondering if there is a similar preset that applies the brightness of the bottom half of the photo to the entire image. Do you know of any?
Thanks,
Leah
Hi Leah,
To achieve this effect, you just have to move the graduated filter around in your photo (upwards in your case). You can even rotate it to flip the brightness effect vertically (if needed). If you can’t make it, just mail me the image and I’ll give it a try :-)
Have a nice day!
I downloaded it but can’t get it to work :(
Hi Wayne,
What is the problem? Can you be more specific please?
//Pierre
OMG!!! I love this website!!! Thank you so much for giving us a site that gives you free presets!!! :)
Thank you Tiffany!
I’m glad you like what you found :-)
//Pierre
Thanks.Nice filters.
Thanks. Very useful presets on your website.
With this preset, do I need to expose properly for the bright area (i.e. the sky) and let the foreground be underexposed?
Thanks for your help.
Thanks Jeric,
Well. It’s a choice you have to make depending on what you want to do with the photo. If you’re looking for an image with dark silhouettes, then Yes. Exposure metering should be on the bright areas. If you expose for the darkest area there’s a big chance your bright areas will burn out. Burned out areas can not be rescued without loosing its structure. Try to measure the exposure on a spot where the bright/dark levels are as equal as possible. The best choice for this kind of photo would of course be to take multiple images with different exposures and then merge them together (HDR).
Hi Pierre,
I am having trouble loading this preset on my Mac, I have downloaded it but cannot get it to open. How do I load it in lightroom please.
Please respond to me at [email protected] as I will your answer faster there not much time to get on here.
thank you ! your presets are really amazing