
Manipulating with white balance (also called color balance, gray balance and neutral balance) can make some cool effects on your photos. Most of the time you want to change the temperature of your photos to make the photo look cold or warm. To do this you just simply drag the white balance slider to the left (cold temperature) or to the right for a warmer look. But what if you really want your image to look natural, as it does in daylight?. You can do this in different ways.The first step is to check your camera settings. Is the White balance set to “Auto” or perhaps a fixed value (like cloud, daylight, sunlight etc.)? If you’re taking photos of products it’s very important that you have the correct white balance set. Especially if you’re not shooting in RAW. Why? Well, if you’ve set your camera to compress (post process) your final images into JPEGs, the white balance will be “burned” into the image and if you later want to change it in LR or any other software, you will lose image quality one way or another.
So how do you get the correct white balance?
One way could be to use the camera settings and set the white balance manually. To do this you need a white sheet of paper or a white balance card (also called gray card). Set your camera to PRE (a mode in the white balance menu) and fill your viewfinder with the white paper. When you press the shutter, your camera will take a reference picture and use it as the source for the rest of your photos white balance (Please read the instructions for your specific camera model).
This is a great way to set the white balance on-site and if you’re shooting in JPEG (I never use JPEG for important sessions though!). Remember that if your environmental light sources changes, you need to set your white balance again. Same procedure is needed if you change photo location (taking product photos in a studio one day and model photos outside the next day etc.)
White balance during post-processing (on the computer)
Another way to set the white balance is to do it in the post-processing phase. This is the way I do it! Shooting in RAW for best possibilities to edit the images after a session is a must. Â When shooting in RAW, the image is separated into two pieces. One with the image and one with all Data like white balance, B&W conversions etc. When you import RAW images into Lightroom these two pieces are put together virtually so that you can manipulate the image without any loss of quality. When you’re done editing you finally export your image to the format you like (JPEG, TIF etc) and the two pieces is put together and merged into one, the image. Since you’ve shoot in RAW, you have the original file intact and can continue to make changes to it over and over again without any loss of quality. I never edit a JPEG-file twice if it’s an important photo. Everytime a JPEG is opened and saved it’s being compressed. Every compression of it will reduce its quality.
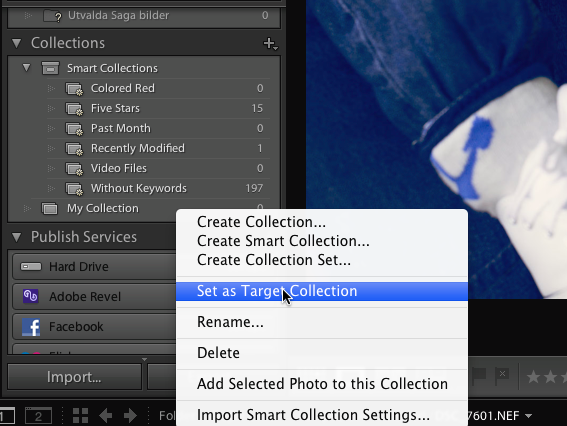
This is how I set the white balance in Lightroom.
On the first photo I take in a photo session, I place a gray card, or tell the person in front to hold it for me. This photo will be my reference photo that I will use when I start the post-processing in Lightroom. I only need one reference shoot with this gray card for each location I shoot (or if the light sources changes).
When I have imported all of my photos from my session, I start by setting the white balance for my reference image. To do this I simply use the White balance selector (shortcut = W )Â and click on the gray card (there shouldn’t be any reflections on the card!). This will make sure that the image has the right white balance and since all of my other photos have been shoot in the same set-up (environment) I just have to synchronize them with my reference image. Voila, now all of my image are set with the correct white balance.
Video of how to set the white balance in Lightroom for many images:


Thanks for the tutorial. Very valuable ;)
Excellent…thank you for taking the time to do that…much appreciated.
Edd
Thank you for this tutorial – very helpful!
thanks very very helpfull
i really ,really,like this,thank you
Excellent Thanks..!!! very easy
Excellent tutorial, thank you.
However is there a way to get the Digital White Balance card like the first picture on the video?
Thanks in advance.
Marina,
You can buy them in most camera stores. I googled it and found this website where you can buy them too: http://www.digitalimageflow.com/
Hi Pierre, thanks for the quick answer. I like all your preset, but sometimes i need to keep the real color for some particular pictures. Thanks again.
Btw nice website! Keep the good work :)
Thank you for the tutorial. I am into business photography and I am sure that I can use whatever I have learned from this tutorial in my field. White has always been regal and professional, just how business photographs should be. Thanks a lot.
I have been searching for this trick on LR for ages and it was right in front of me… lol. Thanks for sharing.
Good post – but graycards I have found to most usefull when doing portraits and other close-ups. But how to set white balance if you are doing landscape photography or cityscapes, where the lighting conditions where you are can be quite different from where the subject is (E.g. a mountain or a lake seen from a far).
I do the same thing with any mid gray area of the shot. I try to ensure that my percentages as shown when you click the WB eyedropper are as close to each other as possible. Somewhere between 60% and 70% and no more than 2-3 points apart i.e.: ( 65%, 64%, 66.5%). This seems to work well for individual shots but I see your technique would be much more accurate for groups of shots as you’re only sampling once and applying same to all.
Now to go and buy a grey card :-)
Thx for the tut!
Thanks Mark!
/P
Yo!! I always look forward to your blog. With thanks, keep up the
good work.
Just to let you know, the Facebook Like press button isn’t working.
thanks, just what i’ve been looking for. Excellent. Can you do one for “un-synch”? thanks, you’re a hero!!!